Developing for the reMarkable tablet
I got my reMarkable tablet last week, and it is great for drawing and taking notes! It almost feels like writing on paper, and I like the fact that it is a device for just that purpose. It has no web-browser, e-mail client or anything that can distract me from my work, which I find refreshing. It’s just for drawing and taking notes.
As an added bonus, the reMarkable runs on Codex, a Linux based OS
that is surprisingly open for any device nowadays.
In the about menu, there is section on GPLv3 compliance
which contains instructions on how to access it from your computer
using SSH and a root password.
Just connect it to your computer using the provided USB cable and
ssh to root@10.11.99.1.
Warning: You can easily brick your device if you start messing around with it with root access. Don’t make the SSH connection if you don’t know what you are doing and are aware of the risks. I wouldn’t expect reMarkable’s support team to be able to help you if you mess anything up this way.
The simplicity of getting access to the device is just short of amazing. Once inside, we get prompted with a BusyBox-based bash shell:

I have no idea who or what “Zero Gravitas” is, but enjoyed the artwork when I saw it for the first time. I assume it is the internal codename of the tablet or something.
Once inside, we can start looking around what’s on the device.
I won’t go into details about everything here, but will shortly note
that you can find your notebooks in
/home/root/.local/share/remarkable/xochitl/.
Each is stored with a UUID name, with files and folders with the suffixes
.cache, .content, .highlights, .metadata, .pagedata, .pdf,
and .thumbnails.
The contents of some of these are quite obvious and accessible,
such as the, .pdf containing the background PDF for annotation,
.thumbnails with PNG thumbs for every page,
and .metadata, which is stored in JSON:
{
    "deleted": false,
    "lastModified": "1511455887733",
    "metadatamodified": true,
    "modified": true,
    "parent": "",
    "pinned": false,
    "synced": false,
    "type": "DocumentType",
    "version": 0,
    "visibleName": "Notebook"
}
Other files, such as the .lines are stored in a custom binary format
which cannot be read as easily.
There is one main application that is used for the main activities on
the device, such as note taking, drawing, PDF annotation, etc.
This is called xochitl and is a systemd service that can be started
and stopped.
This will become useful later, when we want to start running our own software
on the device.
Getting started with development
The reMarkable engineers have provided an toolchain that can be used to cross-compile applications for the device. It currently only supports Linux. If you are on Windows or macOS, I recommend downloading VirtualBox and install Ubuntu in a virtual machine.
Installing the toolchain
The toolchain can be downloaded from
remarkable.engineering,
but the link on that page is currently broken.
Instead, you can try going directly to the file listing on this page
and download the .sh file:
remarkable.engineering/deploy/sdk/
Once downloaded (assumingly to ~/Downloads), run the following in a terminal to start the toolchain installer:
cd ~/Downloads
chmod +x poky-glibc-*.sh
./poky-glibc-*.sh
As soon as the toolchain is installed, it will prompt you with a bash
script that you can load to set your environment variables.
Replace <toolchain_installation_path> with your installation path and run the following:
source <toolchain_installation_path>/poky/2.1.3/environment-setup-cortexa9hf-neon-poky-linux-gnueabi
Setting up the toolchain in Qt Creator
You are now ready to use the toolchain. The next thing is to start Qt Creator from the same bash shell to make sure the environment variables are available there as well:
cd <qt_installation_path>/Tools/QtCreator/bin
./qtcreator
In Qt Creator, go to Tools > Options > Build & Run > Compilers and add two compilers,
one for C and one for C++, both with the following executable:
<toolchain_installation_path>/poky/2.1.3/sysroots/x86_64-pokysdk-linux/usr/bin/arm-poky-linux-gnueabi/arm-poky-linux-gnueabi-gcc
Then, hit Apply and move on to Build & Run > Qt Versions and add the following qmake
executable:
<toolchain_installation_path>/poky/2.1.3/sysroots/x86_64-pokysdk-linux/usr/bin/qt5/qmake
Once done, hit Apply again and go to Build & Run > Kits and add a new Kit based
on your newly added compiler and Qt version.
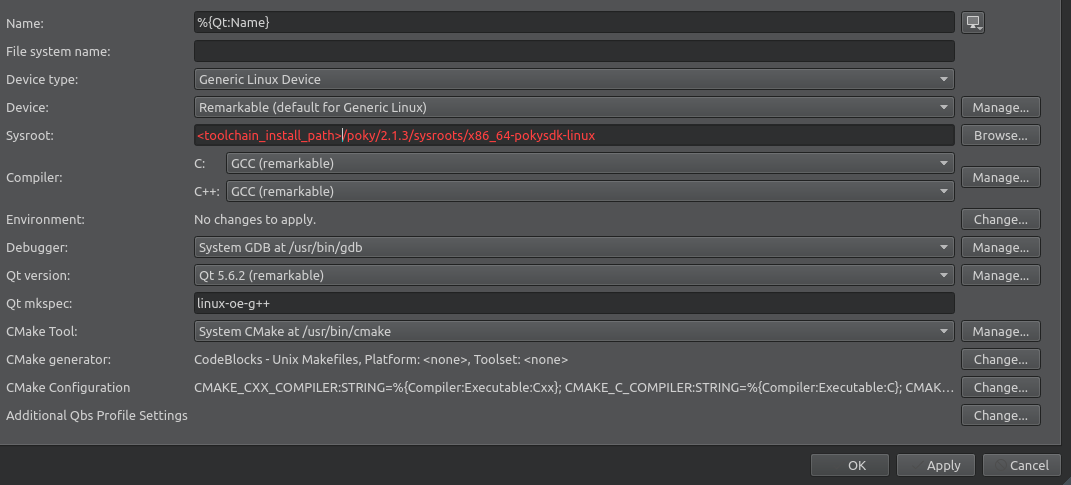
You should also set the mkspec to linux-oe-g++, device type to
Generic Linux Device and sysroot to
<toolchain_installation_path>/poky/2.1.3/sysroots/x86_64-pokysdk-linux
We will set the device up in the next section.
It should look something like this:

Setting up the device in Qt Creator
Once the toolchain is ready, we can move on to setting up the device.
Make sure your reMarkable tablet is connected with an USB cable and accessible over SSH.
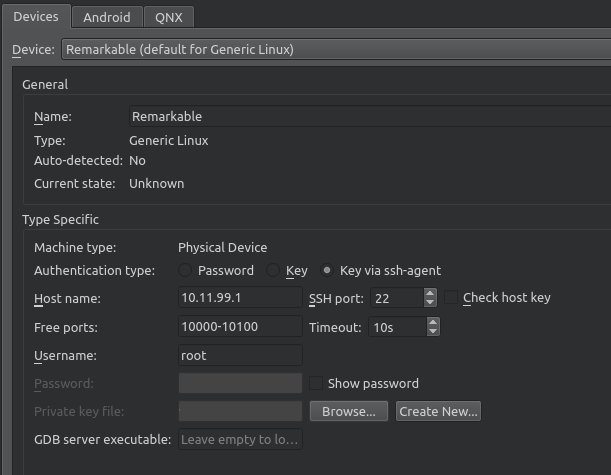
Then, click Manage... next to the Device: field under Build & Run > Kits.
Click Add... and set a name.
Set the Host name to 10.11.99.1 and choose your preffered setup of SSH password or key.
I have copied my SSH key to the device using ssh-copy-id and can therefore use the
Key via ssh-agent option:

You can now click Ok to close the Options view.
Stopping the main application on the device
Now we are ready to create a test application for the device. But first, let us make sure the main application is no longer running. SSH into the device and run the following command
Warning: Once again, please do not do this if you are not sure what the command does. This will interrupt the main application and may cause it to misbehave and cause data loss or corruption.
systemctl stop xochitl
Whenever you want to stop working on your own code, you can start the service again with the following command:
systemctl start xochitl
Sometime in the future, reMarkable might add support for third-party applications from within the device. For now, we have to stop this service to be able to run our own applications.
Implementing an application launcher that is capable of running both the main application and third-party apps provided from an app store is left as an exercise for the reader.
Running a basic Qt application
Create a new Qt Quick application and configure it to use the kit we just set up. To make it run on the reMarkable, we need to enable their custom e-paper plugin for the Qt Quick Scene Graph. Further, we need to set a few environment variables. Thanks to Martin Sandsmark, CTO in reMarkable, for pointing this out to me by e-mail. (They also have a port of fingerterm that may be of interest.)
The main.cpp file of your application should look like the following:
#include <QGuiApplication>
#include <QQmlApplicationEngine>
#include <QQmlEngine>

// Added for reMarkable support
#include <QtPlugin>
#ifdef __arm__
Q_IMPORT_PLUGIN(QsgEpaperPlugin)
#endif
// end reMarkable additions

int main(int argc, char *argv[])
{
    // Added for reMarkable support
#ifdef __arm__
    qputenv("QMLSCENE_DEVICE", "epaper");
    qputenv("QT_QPA_PLATFORM", "epaper:enable_fonts");
    qputenv("QT_QPA_EVDEV_TOUCHSCREEN_PARAMETERS", "rotate=180");
    qputenv("QT_QPA_GENERIC_PLUGINS", "evdevtablet");
#endif
    // end reMarkable additions

    QGuiApplication app(argc, argv);

    QQmlApplicationEngine engine;
    engine.load(QUrl(QStringLiteral("qrc:/main.qml")));
    if (engine.rootObjects().isEmpty())
        return -1;

    return app.exec();
}
We also need to add the following to the .pro file of your project:
linux-oe-g++ {
    LIBS += -lqsgepaper
}
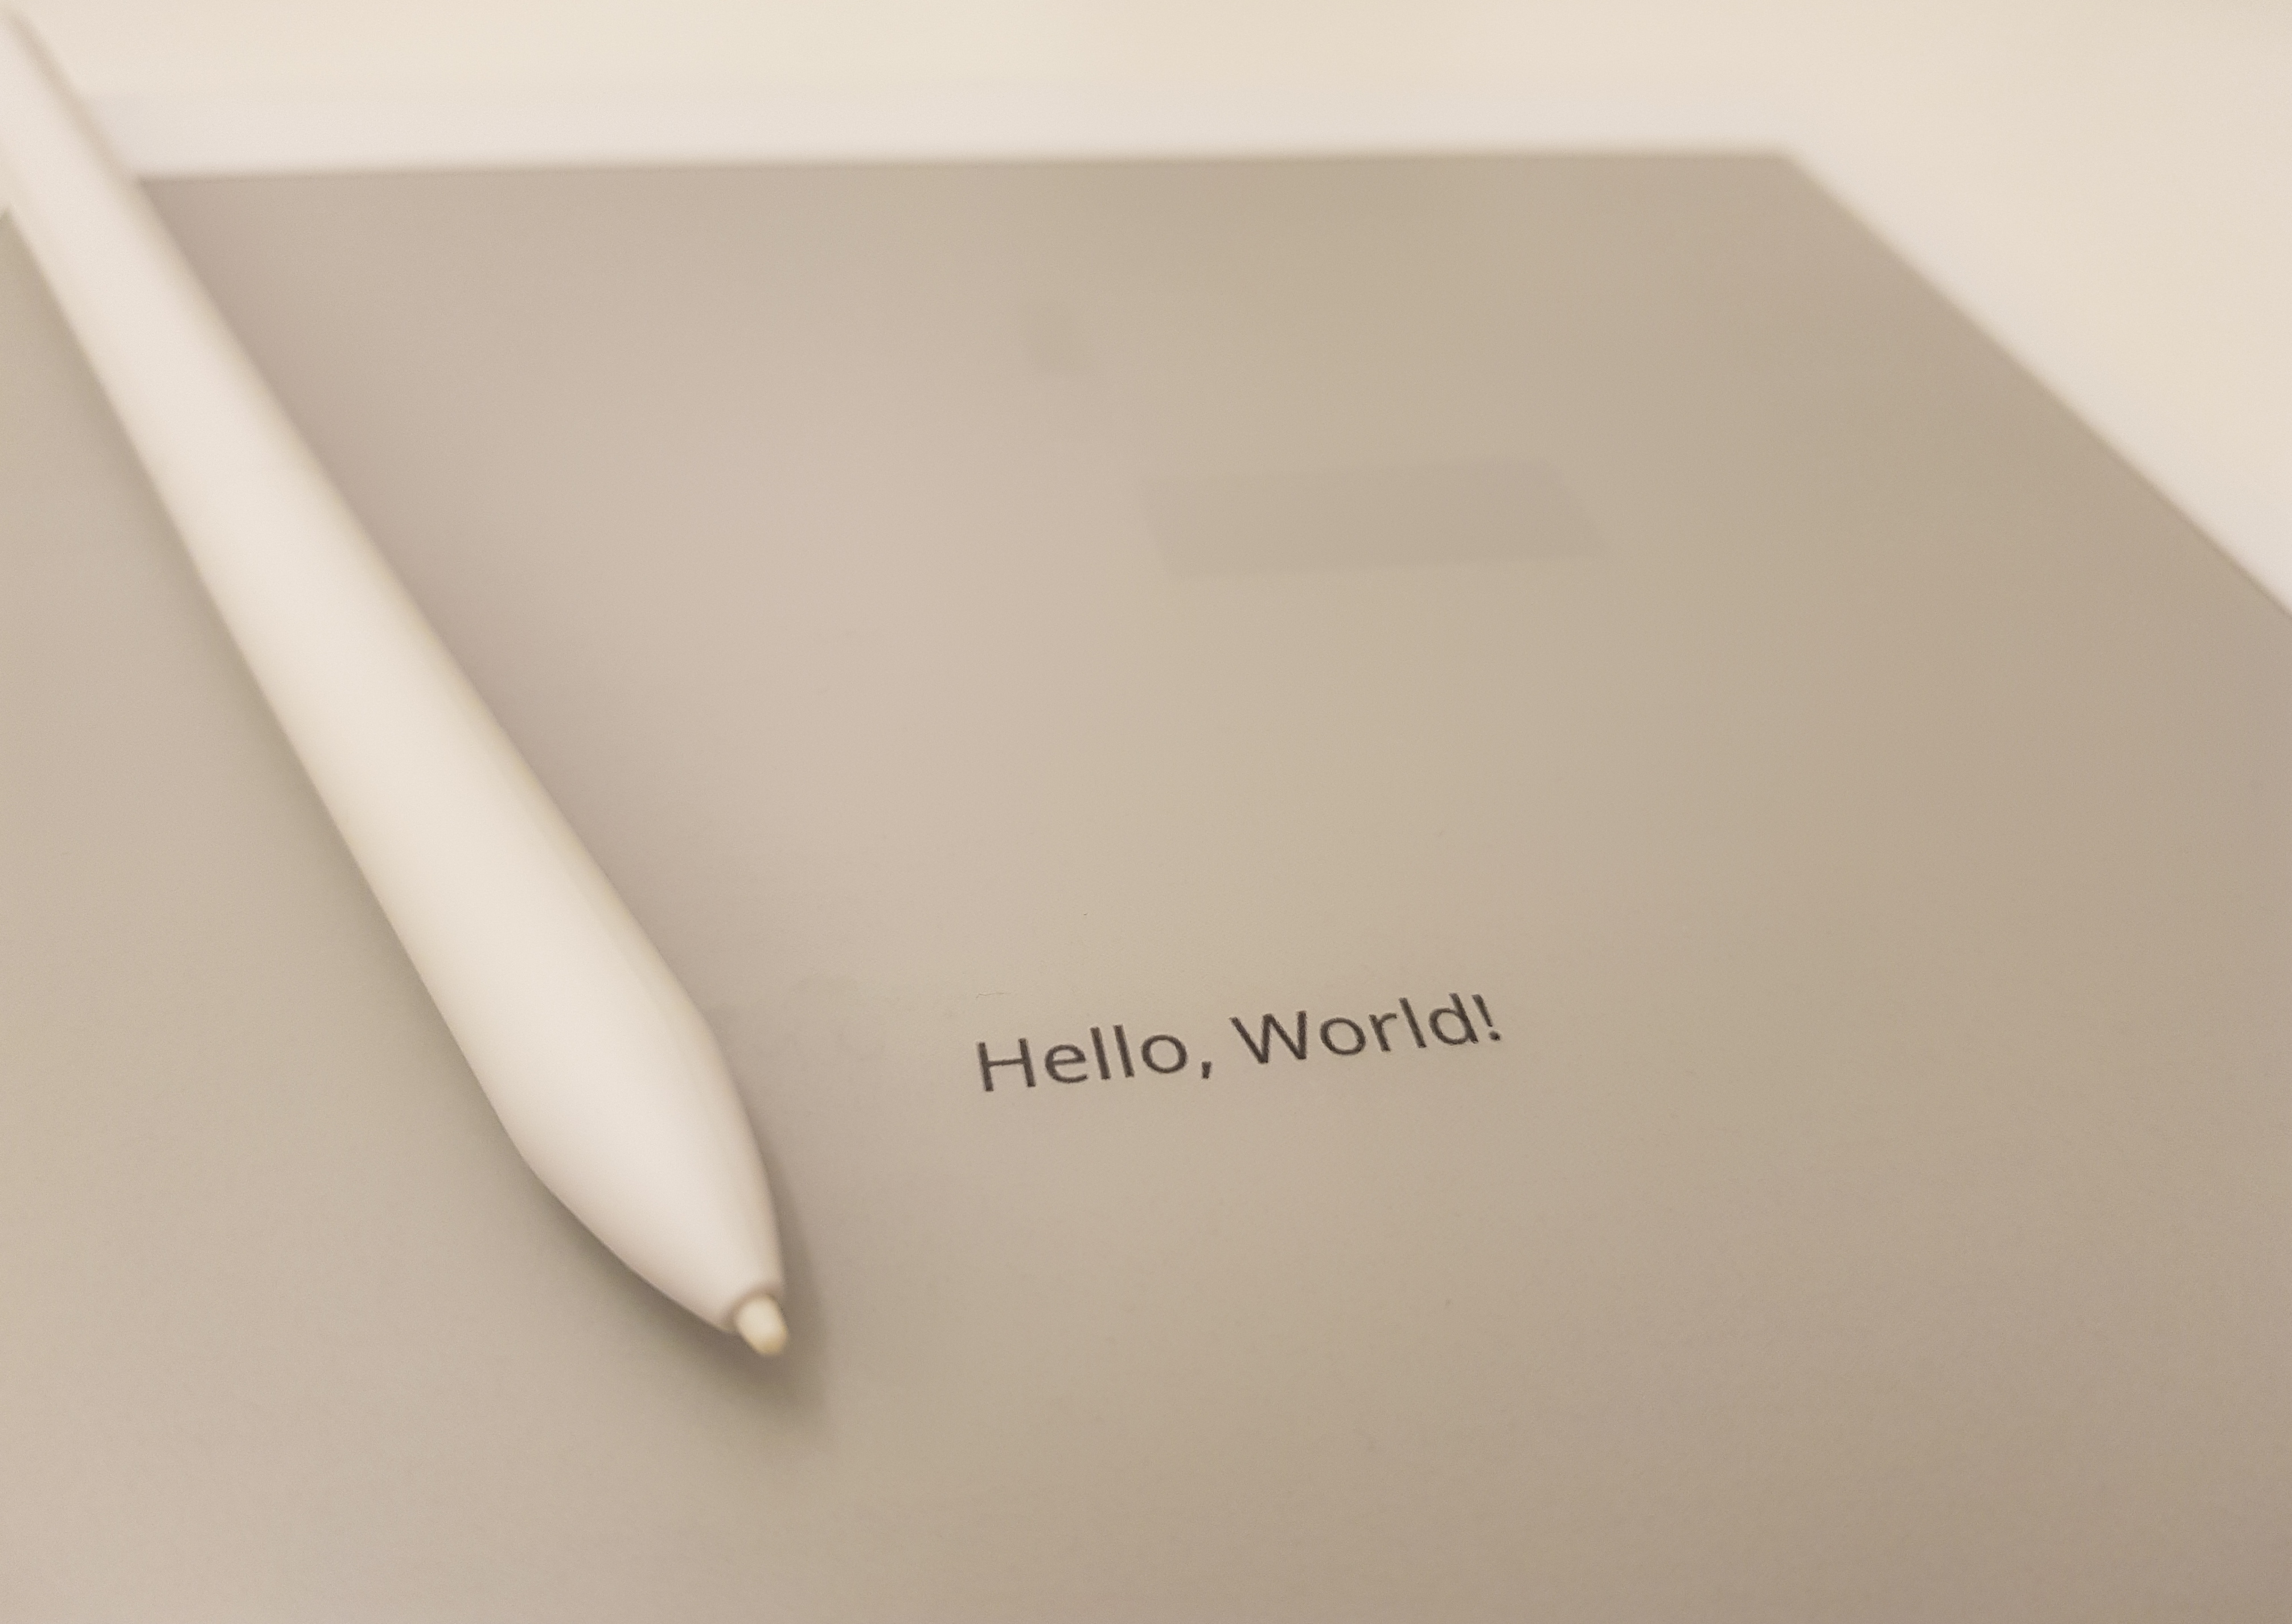
That’s it! You can now try to run your Qt Quick application. Hopefully, you will see something similar to this:

Drawing with tablet events
Touch input works out of the box, and tablet events are also provided to the application. To make use of them, I subclassed a QQuickPaintedItem and based the drawing and input code on the Qt Tablet example. To get the events, I created a custom window that captures all tablet events and passes them on to my custom item.
However, this is far from an optimal way to draw on the device. This redraws the entire screen on each pen stroke, which is both slow and causes the occasional, uncomfortable full-screen refresh.
A workaround I found was to create multiple smaller QQuickPaintedItems and put them in a grid. They all share the same backing QPixmap, but this reduces the number of pixels that need to be refreshed for each stroke. However, too many items makes the performance go bust again. After some testing, I found that 8 rows and 6 columns of items gave the best results. You can find the code at github.com/dragly/hello-remarkable.
Although the painting is still quite slow, this hack gets rid of the full-screen refreshing and produces decent results without too many artifacts:
However, compare this to regular drawing on the reMarkable:
My hacky attempt is far, far away from the responsive feedback that you get with the built-in software on the reMarkable. To achieve the same performance, we likely need to send commands directly to the e-ink screen or some buffer it is using. I haven’t started looking for ways to do this, and expect it might be way harder than what we have done so far. Unless the reMarkable developers have exposed any APIs for this, I expect it might be a bit too related to the “magic sauce that makes the latency go down” that Martin Sandsmark refers to in this comment over at Hacker News. And that magic sauce is likely something that won’t be shared anytime soon.
However, considering how open the device is and how much they have already made available, I wouldn’t be surprised to find a nice set of APIs for low latency drawing, either now or in the future - although the implementation behind those APIs is likely going to be secret for some time.
Oh, and when you are done, don’t forget to stop your application and start the main application service before unplugging your device:
systemctl start xochitl
Otherwise you will be running a pretty poorly implemented drawing app when you pick it up the next time and want to start taking notes.